
Ethanol Fuel
Ethanol vs Fossil Fuel
Grade Level: Middle School
The purpose of the activities in this lab is to compare and contrast ethanol to fossil fuels. For each fuel, we will compare the amount of carbon dioxide produced, the amount of carbon soot produced and the amount of heat produced when burned.
Teaching the Lesson
Everything you need to know to teach the Ethanol vs Fossil Fuels Lesson can be found below. This lab consists of three activities to compare ethanol and kerosene. Each activity can be done independently or collectively. Each activity can be done as a whole class demonstration or as lab stations. What you do and how you do it should be determined by your learning objectives and the needs of the students in the classroom.
- Kansas College and Career Ready Standards
- Learning Objectives
- Materials
- Safety Considerations
- Procedures for Instruction
- Preparation Procedure
- Background Information
- Classroom Discussion
- Procedures for Lab
- Teacher Resources
- Analysis
- Reflection and Conclusion
- Science and Agriculture Careers
- Sources
- Disclaimer
Procedure for Lab
This lab consists of three activities to compare ethanol and kerosene. Each activity can be done independently or collectively. Each activity can be done as a whole class demonstration or as lab stations. What you do and how you do it should be determined by your learning objectives and the needs of the students in the classroom.
Which Fuel Burns Cleaner?
1. Using a digital scale, find the mass of each of your two 250-mL beakers and record information on the data sheet.
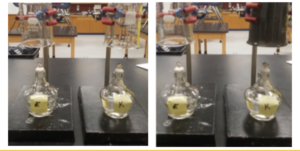
2. Use two burners, one containing kerosene (blue) and one containing ethanol (clear). Make sure the wick of the burners is just barely above the metal casing. Light the burners and check to make sure the flame height is about 2-3 cm above the burner. Extinguish the flame and adjust the wick if necessary.
3. Set up two ring stands with clamps. Set an alcohol burner in front of each ring stand. Invert the 250-mL beakers and clamp them into place with the opening facing downward. Clamp the beakers directly over each burner, approximately 20 cm above the top of the burner. Make sure each beaker is at the same height.
4. Light each burner and start the timer. Let each fuel burn for 2 minutes. During this time, record any observations of what is happening as the fuels burn.
5. After 2 minutes, extinguish each flame. Give the beakers a couple of minutes to cool. Using a hot pad, or beaker tongs, carefully remove each beaker from its clamps. Set aside and make sure the beaker is completely cool before setting it on a digital scale. Use the digital scale to find the mass of each beaker and record the results. Subtract the final mass from the initial mass of each beaker to find the difference.
Questions
- What observations did you make as the two fuels were burning?
- Were you able to observe any difference between the two beakers after 3 minutes? What was that difference?
- What was the difference in mass for each beaker?
- What can you conclude about which fuel burns cleaner?
Which Fuel Produces More Carbon Dioxide When Burned?
1. Measure the carbon dioxide level of the classroom. Break off the ends of the gas detection tube. Insert the gas detection tube into the end of the tubing connected to your 100-mL syringe. There is an arrow indicating the direction of air flow on one side of the gas detection tube. The tubing goes on the end opposite of the arrow. Extract 100 mL of air from the room. This will take a couple of minutes. Pull back on the stopper as far as you can and hold. This creates a vacuum. Over time, this will fill with air. As this happens, you will be able to pull the stopper back further. Hold the stopper at the 100-mL mark until the stopper is no longer being pulled back into the syringe.
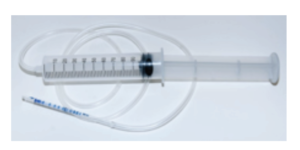
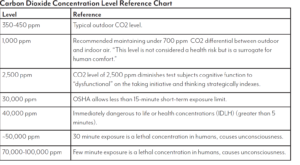
2. Read the carbon dioxide level of the classroom. Take your reading from where the solid purple band stops. There will be a gradient of lighter purple going further up the tube. The measurement is read from where the solid purple ends and the gradient begins. (Picture below read about 500 ppm.)
![]()
3. Break off the ends of another gas detection tube. Insert the gas detection tube into the end of the tubing connected to your 100-mL syringe. Set aside.
4. Burn a glass fuel burner of ethanol in the vent pipe for 2 minutes.
5. Extinguish the flame and cover the top of the vent pipe
6. Through the hole in the side of the pipe, insert the gas detection tube and extract 100 mL of air. Hold the stopper at the 100-mL mark until the stopper is no longer being pulled back into the syringe.
7. Read the carbon dioxide level.
8. Repeat the same procedure (steps 3-7) for the kerosene fuel.
9. Compare the carbon dioxide readings for all three tubes.
Which Fuel Burns the Hottest?
1. Give the students two burners, one containing kerosene (blue) and one containing ethanol (clear). Make sure the wick of the burners is just barely above the metal casing. Light the burners and check to make sure the flame height is about 2-3 cm above the burner. Extinguish the flame and adjust the wick if necessary.
2. Mass each burner and record the initial mass of each burner.
3. Use a graduated cylinder to measure and place 100 mL of room temperature water into the metal cup. (100 mL of water also has a mass of 100 g.)
4. Using a ring stand and ring clamp, position the cup 5 cm above the burner.
5. Use a clamp to suspend the thermometer in the water. The thermometer should not touch the bottom or side of the can. Measure and record the initial temperature of the water in the cup.
6. Light the burners and make sure the flame is centered under the cup. Set the timer for 5 minutes, then extinguish the flame. Measure and record the final temperature of the water.
7. Repeat this process for both fuels. Depending on the time you have in class, this can be done up to three times to develop an average. If you do this more than once, use room temperature water for each test and make sure to clean the soot off the bottom of the cup each time.
8. Find the mass of the burner and record that under the final mass.
During the 5-minute burn time, did the ethanol or kerosene use more fuel?
Teacher Resources
Resources
- U.S. Department of Energy Ethanol Benefits and Considerations
This website provides a variety of information on the benefits of ethanol fuel. - Renewable Fuel Association RFA Ethanol Process Video
Video describing and showing how corn and other products can be transformed into ethanol. - How Stuff Works Biofuels vs. Fossil Fuels
Great easy read comparing biofuels and fossil fuels. - U.S Energy Information Administration Biofuels Explained
This site offers information on biofuels, ethanol, ethanol and the environment. - Office of Energy Efficiency & Renewable Energy Bioenergy Quiz
Interactive quiz with great information pertaining to how it is produced, uses, economic and environmental impact.

About Kansas Corn STEM
Investing in Kansas teachers and students is a priority for the Kansas Corn Commission. We are committed to providing materials and training to support STEM education while fostering an understanding of how corn farming and agriculture fit into our daily lives. Professional development workshops are offered to teachers seeking to expand their knowledge and inquiry-based teaching skills. Workshop participants receive free lab supplies needed for the lessons.
Workshop InfoThis lesson is the work product of the Kansas Corn Commission. Our lessons are written in collaboration with Kansas teachers for use in the classroom. Teachers may copy and share this curriculum. Use of this product for commercial or promotional use is prohibited without express permission of Kansas Corn.
Newsletter Sign Up
Each quarter we release a newsletter written by teachers for teachers. This is an easy way to keep up with what is happening at Kansas Corn STEM.
Subscribe Today!