Back to all Lessons

Free Classroom Kit

Corn: Structurally Speaking

Grade Level: 4th Grade

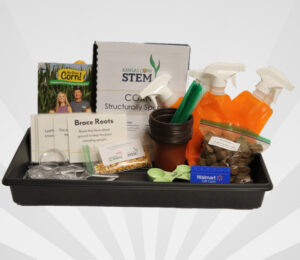
This unit, which focuses on plant structures and functions, is spread over several weeks in order to grow corn plants in the classroom to be used in the last lesson.  In the first lesson, students plant corn seeds in order to sprout plants to be used three weeks later.  They also set up their science notebooks to record ongoing observations.  In the second lesson, which involves observations over 3-5 days, students investigate how a seed germinates, with the structures and functions of seeds being emphasized.  The third lesson culminates in students observing and drawing a full corn plant, identifying structures and functions of the plant.  These lessons can be modified so that instead of growing the plants in the classroom, full corn stalks are brought into the classroom for the final lesson.

Teaching the Lesson

Science

Student who demonstrate understanding can:

  • 4-LS1-1: Construct an argument that plants and animals have internal and external structures that function to support survival, growth, behavior, and reproduction.

Language Arts

  • W.4.2:  Write informative/explanatory texts to examine a topic and convey ideas and information clearly.
  • SL.4.1: Engage effectively in a range of collaborative discussions (one-on-one, in groups, and teacher-led) with diverse partners on grade 4 topics and texts, building on others’ ideas and expressing their own clearly.
  • Students will propose ideas about how a seed sprouts and a plant grows.
  • Students will plant seeds and water them over the course of three weeks.
  • Students will observe the plantings and record their findings by drawing and writing over the course of three weeks.
  • Students will plan and conduct an investigation to determine the best germinating conditions for corn seeds.
  • Students will analyze their recorded data, labeling structures they observe, and indicating functions for them.
  • Students will observe carefully and record their observations of a corn plant by drawing and labeling what they observe.
  • Students will construct an explanation based on evidence that plants have structures that function to support survival, growth, behavior, and reproduction.
  • Printable version of Corn: Structurally Speaking**
  • Pretest**
  • Posttest**
  • Science notebook with seed growth journal**
  • Corn seeds*
  • Soil*
  • Planting containers*
  • Water and spray bottles*
  • Zip close sandwich baggies*
  • A variety of liquids such as orange juice, soda, energy drink, vinegar, oil, milk, baking soda water (gift card*)
  • Sharpies for labeling
  • Corn seed germination diagram with labeled structures**
  • White paper
  • Colored pencils
  • Magnifying glasses*
  • Flash cards of plant structure names**
  • Diagram of corn plant with structures labeled**
  • Content on structures and functions (video being developed)**
  • 3-week old corn plants OR full grown corn stalks

*Items will be included in the free teacher kit.  Request materials.

**Documents are also linked throughout instructions below.

  • Be aware of student allergies or seeds treated with chemicals.
  • Remind students to handle materials appropriately.

Lesson One: Planting

(30 minutes, to be done 3 weeks prior to the rest of the unit; then ongoing observations for next 3 weeks to document plant growth)

Key question: How does a plant grow?

Learning Objectives

  • Students will propose ideas about how a seed sprouts and a plant grows.
  • Students will plant seeds and water them over the course of three weeks.
  • Students will observe the plantings and record their findings by drawing and writing over the course of three weeks.


Materials

  • Pretest (Parts of a corn plant)
  • Science notebook with seed growth journal
  • Corn seeds (1-3 for each student)
  • Soil
  • Planting containers (one for each student)
  • Water and spray bottles

Procedures for Instruction

 Pre-lesson preparation

If your students utilize science notebooks, print out the notebook pages and have students cut and paste the pages into their notebooks.  If your class does not use specific science notebooks, consider makings ones by copying and stapling together pages to create science notebook for your students.  Different versions of these pages are below.

Science Journal- Handout Size

Science Journal- Composite Notebook Size

Science Journal- Spiral Notebook Size

Assess students for prior understanding

Have students fill out the pretest to assess their understanding of the parts that help the plant grow. Collect the pretests, and then on their first journal page, give them 5 minutes to draw and/or write about how they think a plant grows.  “How does a plant grow? Show by drawing or writing, or both.”

Parts of a Corn Plant- No Words

Introduce project and engage students

  • “We just recorded our thoughts on how seeds grow.  How many of you have grown seeds before?”
  • Pass out corn seeds, and ask, “What are these?” “Where do you think they came from?”
  • Guide them to recognize them as corn seeds that came from a corn cob, and that we eat corn seeds when we eat corn.
  • “Today we are going to plant these corn seeds to grow our own plants!”

Plant seeds

  • Distribute materials to students.
  • Have students label the containers with their names.
  • Put soil in container, plant seeds, and water with spray bottle.
  • Note:  Optimum planting depth of corn kernel is 1-2 inches deep. Emergence of leaf above the soil will take approximately 5-7 days.

Document their thinking

In their science journals, have students draw a picture of what their container looks like now, and what they imagine it will look like in 3 weeks.

Observe and record results over 3 weeks

  • Have students water the soil as appropriate with spray bottles over the next 3 weeks to keep soil damp.
  • Provide brief (3-5 minute) observation times every few days for students to observe (draw) and record (describe) in their science journals the progress (or lack thereof) of their plants.

Formative Assessments

  • Assess prior learning using the pretest.
  • Assess contributions in discussions for prior understanding and adjust instruction if needed.  Do students have experience with growing plants?  Do they understand what seeds are in general, and what a corn seed is specifically?  Are they aware that many seeds provide important food sources?  Are they also aware that some seeds can be poisonous to eat?  Crops such as corn, wheat, and soybeans are grown because those seeds are good as a food source.


Lesson 2:  Seed Germination

(45 minutes, with follow-up observations for 3-5 days, and 45 minutes on final day)

Key question: How does a seed germinate?

Learning Objectives

  • Students will plan and conduct an investigation to determine the best germinating conditions for corn seeds.
  • Students will observe and record data (drawings and descriptions) while seeds are germinating.
  • Students will analyze their recorded data, labeling structures they observe and indicating functions for them.

Materials

  • Corn seeds in 2 plastic baggies, prepared a day or two in advance with one having a little water added, and the other that is dry.
  • Additional dry seeds
  • Baggies for students
  • Water and a variety of other liquids such as orange juice, soda, energy drink, vinegar, oil, milk, baking soda water
  • Sharpies for labeling
  • Science notebooks with seed growth journal
  • Colored pencils
  • Magnifying glasses
  • Corn seed germination diagram with labeled structures

Procedures for Instruction

Pre-lesson preparation

If your students utilize science notebooks, print out the notebook pages provided in lesson 1.  If your class does not use specific science notebooks, consider makings ones by copying and stapling together pages to create science notebook for your students.

 Day 1 (45 minutes)

Introduce the topic and assess prior understanding

  • Present the 2 bags of seeds to students, one that had a little water added a day or two ago, and one that is dry.
  • Tell students that you aren’t sure what happened to the seeds: “Look what I found!  Here are 2 bags of seeds.  They look like they’re left over from when we planted our seeds three weeks ago!”
  • Don’t tell the students that one has water in it – let them discover this on their own.  Pass the bags around.
  • “What do you see?”
  • “What do you think happened?”
  • “They look different – I wonder why?”

Record their thinking in their science notebook, and discuss as a class to assess their thinking.

Do not signal right or wrong answers.  Just let them discuss their ideas, and guide the flow with such prompts as:

  • “Can you say more about that?”
  • “Why do you think that?”
  • “Who agrees/disagrees with this idea and why?”
  • “Does anyone have a different idea?”
  • “Would this be true all the time?”

Develop an investigation as a whole class or in small groups

Develop an investigation as a whole class or in small groups based on the question, “How does a seed germinate?”  Hand out corn seeds and baggies, letting students figure out that they will be placing a few seeds in each baggie, and seeing if they will germinate in different conditions.  Have a variety of liquids setting out.  Guide the development of the investigation with such questions as:

  • “What does a seed need to germinate?”  (Based on the introductory activity, they should realize it needs water.  If not, guide them to reflect on the introductory activity to understand this.)
  • “Does it have to be water, or can it be any liquid?  Does it have to be a liquid?”
  • “Which liquid will work best?  Why?”
  • “Should the bag be opened or closed?  Why?”

Focus the elements of their investigations

  • “What is our research question or questions?”  Have students generate their own questions about the seeds, and possibly set up different observation stations around the room for different questions.  Write the questions on the board or anchor chart.
  • “What kind of data do we need to collect to show what we know?”  (Introduce seed germination journal, and how they will observe, draw, and write in their science notebook.)
  • “What are the different conditions (variables) you want to test?”  Let the students pick the different kinds of liquids they would like to test.
  • “Should we have something to compare to?  Would the seeds just have germinated anyway?  Should we set up comparison baggies (controls) using no water, and just water?”
  •  “What do you think will happen and why in each condition?”  Have them record this as a prediction or hypothesis.

Instruct students to set up the investigation.

  • Guide students to prepare their baggies and seeds according to their own questions.
  • Using sharpies, have them label their baggies with their name and conditions.
  • Have them record the set-up of their investigation, including research question(s), type of data they will need to collect, different conditions (variables), what they will compare the experimental conditions to (controls), and predictions/hypotheses.

Days 2-5

Record their observations in their science notebooks by drawing and writing.

  • Use colored pencils and magnifying glasses.
  • Each day for 3-5 days, have students observe the progress of the germinating seeds and record their data.  Be sure they draw and write in their science notebooks what they see happening with the corn seeds in their baggies.

Final Day (45 minutes)

Discuss their findings by having students share results.

You can do this as a large group, making note of their findings on an anchor chart or on the board, OR you can split them into small groups to compare their findings and report out.  Lead the discussion with such questions as:

  • “The corn seeds germinated best in which conditions?”
  • “How did the various liquids compare to our control conditions (water and dry)?”
  • “Why do you think you got the results you did?”
  • “Were there any contradictory results?”
  • “What new questions do you have based on your findings?”
  • “Based on your evidence, how do you think a corn seed germinates?”
  • “Do you think this is true of all seeds?  How could we find out?”

Explore seed and sprouting seed structures

Ask students to examine their drawings from the different days again, and

  • Label the different structures they drew or wrote about.  Do not give them the “proper” terms for the structures – let them use their own descriptive words.
  • Then have them suggest functions for each structure – again, do not signal if they are correct or not, but have them justify why they think that.  Encourage their thinking.
  • Discuss these structures in a large group with having students share their labeled structures and proposed functions.

Explain how their discoveries are very much like those of scientists’ discoveries.

  • “You planned and conducted an investigation to determine how corn seeds germinate, and you have formed conclusions based on very convincing evidence!  You are budding scientists!
  • “You observed carefully and identified parts of the seeds, and proposed functions for them.  You are certainly budding scientists, because that’s what many plant scientists do – they observe carefully and identify structures on plants that many people never even knew were there!  If those structures have no names, they have to name them.  They also observe very carefully over time to see what functions those structures have.
  • “Let’s look at what scientists have named the structures you identified, and what they have found are their functions.”

Show a diagram (model) of corn seed germination, with major structures labeled.

Parts of an Emerging Seed- No Words

Parts of an Emerging Seed- Words

Emerging Corn Plant Structures and Functions

  • Distribute copies of diagrams to students and have them label the structures as you guide them.
  • Have them compare their terms for each structure to the term scientists use.
  • If they have room, they can label their own drawings with the scientific terms.
  • Discuss the function of each structure.

Conclusion

  • “Were you surprised to discover so much going on in the seed as you observed them germinating?”
  • “What do you wonder about now?”  (Guide them to connect the seed germination they have observed to the seed germination that occurred in the soil of the plants growing in the classroom, AND the plants growing in corn fields throughout the world.  In fact, all seeds of plants germinate in similar ways – this is happening underground all over the world!)
  • Show the time lapse video of corn growth called, “Time lapse fast growing corn, roots, and leaves growing” found at https://youtu.be/aJM3gb4QoJA

Formative assessments

  • Assess contributions in discussions for prior understanding and adjust instruction if needed.
  • Assess their observation and recording skills as they draw and write in their science notebooks.  If needed, encourage them to look closer, to notice things with the magnifying glasses that are slightly hidden (are they seeing all the root hairs, for instance?).

Summative assessments

  • Science Notebook observations
  • Corn Seed Germination diagram, labeled with structures and functions

Extra Information for the Teacher

A seed is the house for a future plant, outfitted to furnish what a baby plant needs to start to grow and succeed in life. A seed is wrapped in a tough outer coating (seed coat) that prevents the future plant from damage. Inside, there is a food supply and the beginnings of a new plant.  In the world of flowering plants, there are monocots and dicots.  A monocot seed has an embryo that contains one cotyledon, the part of the plant that becomes its first leaf-like structures. A dicot seed has an embryo with two cotyledons. The cotyledons help provide and absorb nutrients for the plant until the plant is ready to make its own food through photosynthesis.  Corn kernels are monocots, and beans are dicots.


Inside a corn kernel (seed), there is a cotyledon near the bottom, pointy part of the kernel, where the new plant begins to grow. It is surrounded by the endosperm, which is starchy food for the baby plant. When the seed begins to grow, its protective covering breaks open in two places. The top breaks open to reveal the coleoptile and eventually the plumule, the future shoot of the plant. The bottom breaks open to reveal the coleorhiza and eventually the radicle, the future root of the plant.


Like the corn seed, the bean seed has places where the root and the leaves emerge. However, since bean seeds are dicots, when you open one up, you’ll see it has two cotyledons that look like reverse copies of each other. Instead of having a separate baby plant and food supply, inside the bean plant the cotyledons contain the endosperm (the food supply).


As the root grows, tiny little root hairs extend out to form a net-like mass to absorb water at a microscopic level.  Guide students to look for these and all the structures using magnifying lenses.

Lesson 3: Corn Plant Observations

(45 minutes)

Key Question: “What structures does a corn plant have?” “What functions do the plants structures serve?”

Learning Objectives

  • Students will observe carefully and record their observations of a corn plant by drawing and labeling what they observe.
  • Students will construct an explanation based on evidence that plants have structures that function to support survival, growth, behavior, and reproduction.

Materials

  • 3-week old corn plants OR full grown corn stalks
  • White paper
  • Colored pencils
  • Magnifying glasses
  • Flash cards of plant structure names
  • Diagram of corn plant with structures labeled
  • Content on structures and functions (video being developed)

Procedures for Instruction

Introduce the topic and engage students

  • Give students a corn plant (or one plant for 3-4 students), and distribute paper, colored pencils, and magnifying glasses.
  • Instruct students to observe carefully and draw what they see.
  • Instruct them to label the parts (structures) – they can make up words for any structures they don’t know.
  • The technical terms do not matter now, but rather the goal is for them to observe and draw the important structures of the plant.
  • Instruct them to write what they propose the function is for each structure.

For at least 20 minutes, students should be completely quiet during the drawing and labeling of the plant parts.  Guide them to look closely and use magnifying glasses for things that might be hidden to most people!

Small group discussion and exploration

Share out with the class or small group what they noticed, and what they predict the function for each part is with questions such as:

  • “What did you notice?  Did you all notice that?”
  • “Did you know its name, or did you give it your own name?”
  • “Why do you think that plant has that part?  What do you think it’s used for (function)?”
  • “Why do you think that?  What is it about that shape or that structure that makes you think that?
  • “Can you say more about that?”
  • “Who can say what you think __________ is saying?” (this helps them listen to each other’s ideas)

Do not indicate right or wrong – just collect their observations and thoughts.

Learn the science terms for structures and their functions.

Plant Structure Flash Cards

  • Hand out the flash cards with the plant structure names.
  • Have the students place the flash card next to the structure that they think corresponds with that name.
  • Hand out or project the plant diagram with the structures labeled.
  • Ask them to revise any placement of their flash cards.

Explain the functions of the different structures

Corn Plant Structures and Functions

Revise their drawings

  • Have students go back to their drawings and revise their labels.
  • Add the terms that scientists use for the structures (don’t encourage students to cross theirs out since their own terms were not “wrong” – just add the scientific terms).
  • Add the functions of each part according to scientists.

Write an explanation

Instruct students to write 7-10 sentences to go along with their drawing to explain that corn plants have structures with specific purposes that help the plant.  Be sure they use evidence based on their observations or other information they found.

Conclusion

  • Hang their drawings up and have a gallery walk
  • Discuss that they worked as scientists, because they:
    • Observed carefully
    • Recorded what they observed
    • Proposed names for structures and functions
    • Revised the names for structures and functions based on what other scientists have learned
    • Worked together and communicated with each other!

Assess using post-test

Two post test options are available.

Post test- corn plant parts without functions

Answer key- corn plant parts without functions

Post test- corn plant parts with functions

Answer key- corn plant parts with functions

Formative assessments

  • Assess students’ abilities to observe in detail and record observations by their drawings.  If they are “done” early, tell them there are parts that may need magnifying glasses to see and to look very carefully.
  • Assess students’ understandings of how structures serve functions for the plant in discussions.

Summative Assessments

  • Assess students’ understanding of structures and functions by their final revised drawings.
  • Assess overall learning throughout the unit by comparing pretest with post-test.


About Kansas Corn STEM

Investing in Kansas teachers and students is a priority for the Kansas Corn Commission. We are committed to providing materials and training to support STEM education while fostering an understanding of how corn farming and agriculture fit into our daily lives. All K-5 lessons come with a free teacher kit that includes the teaching materials needed for each lesson.

Request Materials

This lesson is the work product of the Kansas Corn Commission. Our lessons are written in collaboration with Kansas teachers for use in the classroom. Teachers may copy and share this curriculum. Use of this product for commercial or promotional use is prohibited without express permission of Kansas Corn.

Newsletter Sign Up

Each quarter we release a newsletter written by teachers for teachers. This is an easy way to keep up with what is happening at Kansas Corn STEM.

Subscribe Today!